
PPC111 | Technical
John Horsley, BPCA’s Technical Officer, looks at pest control proofing fundamentals, and the tools and materials he wouldn’t be without on every job.
SPEED VIEW:
• Learning basic maintenance skills can give you a leg up when it comes to being an effective pest professional • Using the right material and tools for the job is crucial to getting it ‘right first time’ • There are a range of tools that will help you proof and should be staples in your kit bag • The question of ‘when to proof’ is much debated, but it’s often site-specific.
Jump to what's in my toolkit
“Choose ‘right first time’ approach – when it comes to proofing we should use the best methods, tools and knowledge available to offer the most permanent solution. Do the best job possible the first time and you won’t have to do it again.”
My dad was a joiner by trade, and from a young age he put me to work learning basic DIY. As I moved into my teenage years, the projects became more extensive, from hanging doors and fitting kitchens, to building boats. And in the process, he set me up for life with transferable skills.
If you’re fairly new to pest control, why not give yourself a strong foundation by learning some of these skills?
There are so many resources out there now, so if you didn’t learn from a parent then try YouTube, shadowing other pest professionals who specialise in proofing or if you’re really serious, local colleges offer night school classes for subjects like joinery and bricklaying.
However you decide to do it, hopefully you’ll be able to find a pathway to develop your skills.
When the time is right
There is often a debate on when to carry out proofing work. Some techs prefer to do proofing immediately, and others prefer to control the pests before proofing.
But in most cases, it’s very much site-specific and you need to do a thorough survey, assessing what the outcomes of proofing before or after would be.
For example, if you need to proof drains or external holes against rodents, would doing it during the treatment prevent them accessing a specific area of the building where you’ve baited? Will it be forcing the pests to another part of the building where they’ll be harder to control?
To get it right-first-time, we usually get it wrong a bunch of times before that! It’s all part of the learning process, but hopefully with the right people guiding you, the right training and the right tools for the job, you’ll be one step closer to adding proofing to your skillset.
The usual suspects
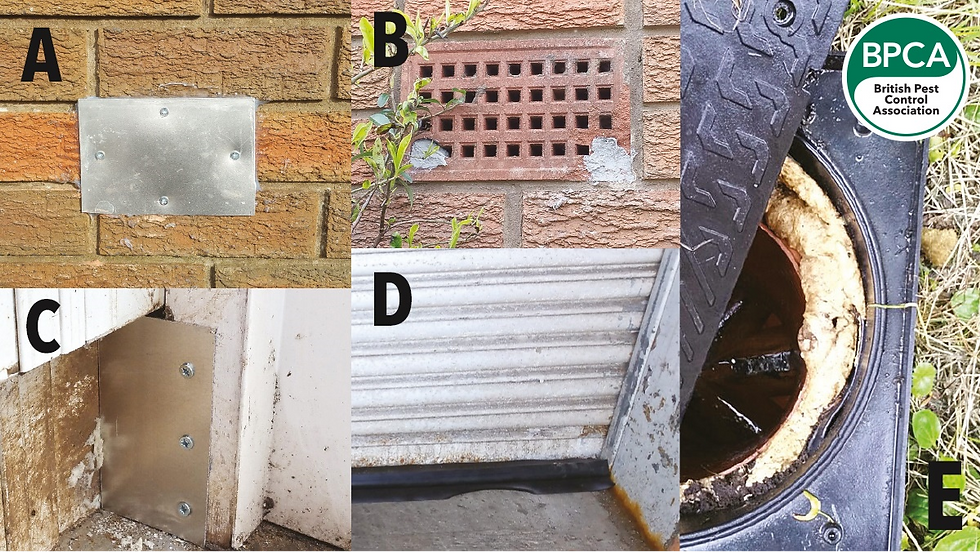
A. A hole left by removed waste water pipes is covered by an aluminium plate secured by screws and sealed with clear silicone.
B. Damaged corners to an airbrick, allowing the transit of mice, are sealed with premixed mortar. The airbrick is at some height but the texture of the bricks and the presence of a shrub allow for an easy rodent ascent.
C. Timber frames can rot at ground level, due to being sat in rainwater. Rodents can easily chew through this rot. Proofing is achieved with an aluminium plate secured by wood screws.
D. Up-and-over garage doors, and roller shutters can be proofed along the ground with a flexible ‘rubber’ seal.
E. Expanding foam should be rarely employed, as it’s easily nibbled away and can degrade over time. It can be used to provide a first-aid measure, where more permanent works are scheduled at a later date. It is useful as a void filler to allow an outer plug of thick mortar.
What's in my toolkit?
We all have our favourites, but here are my six most used tools when it comes to proofing. As always, learn to use the tools correctly and safely.
With what feels like an infinite amount of products available from various manufacturers and outlets, it can be a little overwhelming.
Before I go into materials, it’s important to point out that using an incorrect material in the wrong place could not only lead to an ineffective treatment, but also cause damage or even run the risk of causing a fire.
Always be mindful of what you are proofing and if you are using suitable products for it.
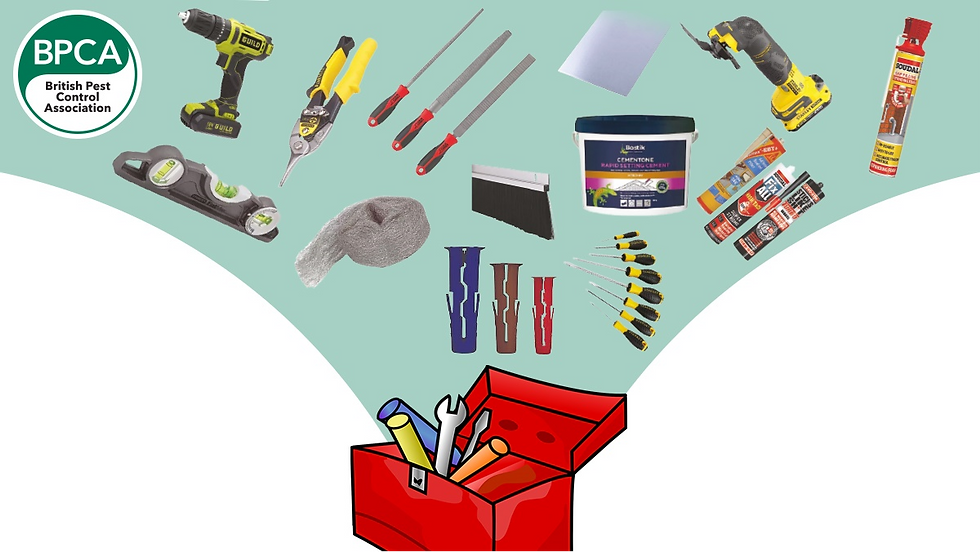
Cordless drill It goes without saying the most used item in my tool bag must be the cordless drill. A good combi drill should cover almost all day-to-day drilling activities. On most combi drills, you will have three settings: drill, screw and hammer.
Drill – best used when going through wood or steel.
Screw – has a torque limiting function, allowing you to set the pressure you would like the drill to stop driving a screw in and prevent over-tightening screws into wall plugs or timber.
Hammer – this setting is used on all brick and block surfaces when using a masonry drill bit. The exception to this is when drilling into tile; it’s best to use the hammer function sparingly as it can shatter the tile.
Cordless multitool Possibly my all-time favourite tool is a multitool. For cutting and sanding in awkward places, there is no better tool. I’ve used it mainly for cutting into plasterboard, backboards in cupboards or into floorboards.
It gives an excellent clean cut, is accurate, and you can go slowly into the plasterboard to not cut through any cables or pipes that could be behind.
You can get steel blades that work great for trimming the edge of bristle strips, should you put it on slightly extended and the door doesn’t close.
Tin snips You can get a variety of tin snips, with the large scissor type best for cutting straight lines and the short, curved ones for cutting around corners. Some designs come with heads for cutting anti-clockwise, clockwise and straight cut.
A set of straight-cut tin snips is usually versatile for most jobs.
Spirit level A small spirit level is a simple but great solution, especially one that’s magnetic. They can help level up things like EFK units and inspection hatches, and level off bristle strips and proofing plates. They also double up as a handy ruler when drawing site plans.
Screwdriver set These are a bit old school now and it seems obvious to say, but a set of different size screwdrivers can be a game changer. Don’t underestimate the simple tools!
In fact, the largest of my flat-headed screwdrivers often comes in handy as a mole dibber for finding mole tunnels. Talk about versatility.
Steel file set Sometimes the finishing touches make all the difference. Taking the burs off the ends of cut steel will save you or someone else from cutting themselves on them. This is equally important when cutting metal plates and gives that professional clean finish. No slap-dash jobs here!
Metal plate Aluminium plates are a staple, particularly the ones slightly larger than the size of a sheet of A4 paper. You can cut sections for small jobs or use the whole thing for stuff like missing breeze blocks or even proofing around 4-inch waste pipes.
You can now find flat plates that are cut in two with a half-moon missing out of each half. These will have a standard hole size of 15mm water pipe in a house, 40mm/50mm waste pipe from a sink, and 100mm of 4 inches, a standard toilet waste pipe size.
Wire wool Wire wool is a great product when used correctly but often requires covering with silicone, meaning it’s better for smaller holes. I particularly like this for proofing door frame corners or small holes in the brickwork.
It can be more discreet than a metal plate, and using silicone over the top helps it stay in place, preventing it from being removed by rodents or anyone else.
In most cases though, I wouldn’t classify this as a permanent solution, as it could quickly fail if it had not been securely fixed. I have even come across two instances where wire wool has caught on fire.
One was on a site where the customer carried out some proofing and filled all the holes with wire wool. A piece had been pulled out and ended up on a cable connection.
The second time was in a technician’s bag when a piece of wire wool came into contact with his torch. The charging connector on his torch created enough charge to ignite the wire wool.
Silicone and construction adhesives You will mainly find three types of adhesives: silicone, silicone with adhesive, and construction adhesives.
Silicones are made from silicone polymers, whereas construction adhesives are typically made from polyurethane, epoxy, or acrylic. I found using silicone gave a better finish when filling gaps around wall floor junctions.
Silicones are much better for areas where you need some flexibility or extreme temperatures and weather conditions. Construction adhesives usually are less flexible depending on the formulation.
Cure time can be a factor, as silicones will take longer to cure, and some will only create a stronghold once almost entirely cured, which could be a minimum of 24 hours.
When used thinly (2mm), construction adhesive can cure in a couple of hours. They often have an instant grab and bond feature, perfect for fixing metal plates.
Sand and cement In the past, making mortar or cement required buying a bag of each ingredient and mixing it in a small bucket. You can now get premixed in a tub, silicone-style tubes or bags where you just add water.
I would mainly use the 3kg tubs as I found I could use them on a few jobs before it gets used up or goes off. You can also get heat-resistant fire cement in 1kg pots, should your site require it.
These products usually are best for anything under a golf ball sized hole; larger, and it becomes difficult to stop the cement from falling out or settling, leaving a gap at the top of the hole.
Bristle strip and rubber boots I’m not sure it is possible to talk about proofing without talking about bristle strips. Before fitting any bristle strip, it is worth asking a couple of questions:
Could the door be fitted better?
Is the door in good enough condition for a bristle strip to be fitted?
Wooden doors are ordinarily susceptible to rot around the base of the door, meaning a screw would not hold a bristle strip on. It sounds obvious but it’s a common mistake. In most cases, bristle strips are simple to fit, ensuring they fit the gap left when the door is closed.
Pan head screws are best when fitting into wood doors, and the self-tapping screw I found works best for metal doors. There is also a solid rubber-style door sweep, including some filled with wire wool so they can’t be chewed through.
Rubber can catch on the floor, making it difficult to open the door.
When fitting them, I put a 2p coin under each end of the strip to raise it up slightly. This prevents it from catching the floor but wouldn’t allow mice to squeeze under.
Expanding foam It’s a swear word in the pest control industry! Popular with the cowboys and rodents can chew right through it. I’ve seen mice create a nest inside a piece of hollowed-out expanding foam.
However, I found it handy when working in a warehouse with expansion joints on the concrete floor. To narrow down our control area, we filled the gap with expanding foam.
The following day mice had chewed out of one end, which allowed us to narrow down our treatment area and see if they emerged in a different location from the floor void.
Once the treatment was completed, we scraped the foam back just below the concrete slab’s surface and applied a rubber product to seal expansion gaps. The foam helped prevent the sealant from falling down the void.
“It’s a swear word in the pest control industry! Popular with the cowboys and rodents can chew right through it. I’ve seen mice create a nest inside a piece of hollowed-out expanding foam.”
Wall plugs Wall plugs now come in various forms, from the traditional red and brown plugs to new multi-use wall plugs that will fix into bricks, blocks, and even cavity walls. For heavy-duty fixing on cavity walls, you will need to look at specific cavity wall plugs or toggle fittings.
Comments